Alphacam Basics – Alphacam Snaps – lesson 24
|

Alphacam Basics – Alphacam Snaps – lesson 24

Alphacam Snaps – Alphacam Tutorial for Beginners Snaps – something definitely useful! When you create a geometry or eg. use some function from Edit Tab on the command line Snaps appears. You can also find Snaps in the Geometry Tab. First Snap on command line is Auto-Snaps. I will discuss this later. Let’s see END-point…

Alphacam Basics – Geometry to construction  – lesson 20
|

Alphacam Basics – Geometry to construction – lesson 20

How to change Alphacam ‘green’ geometry to construction – way 1 The first way to change the ‘standard’ geometry to construction geometry is moving geometry from Geometry layer to Construction layer using drag and drop method. This is very easy when we have small amount of geometries. When we have complex drawing with many geometries…

Alphacam Basics – Construction geometry – lesson 19
|

Alphacam Basics – Construction geometry – lesson 19

Construction geometry in Alphacam This command allows us to create auxiliary geometries. This geometries can be created using all of the same tools located in the Geometry Tab and you can edit it using options from the Edit Tab but construction geometry can not be machined. Now, when this option is active, all drawn geometries…

Alphacam Basics – Enclosing rectangle – lesson 18
|

Alphacam Basics – Enclosing rectangle – lesson 18

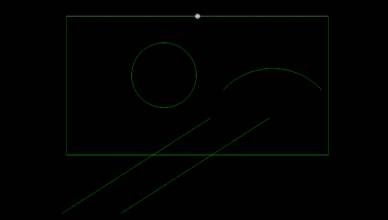
Alphacam Enclosing Rectangle Enclosing Rectangle is another option from Special Geometries. Create any geometry or open the file from the previous lesson. Now select the Enclosing Rectangle and in command line select All. This will select all geometry in the workspace. Accept this by clicking RMB. We received a rectangle enclosing whole geometry. Please see…

Alphacam Basics – Equi Spaced holes – lesson 17
|

Alphacam Basics – Equi Spaced holes – lesson 17

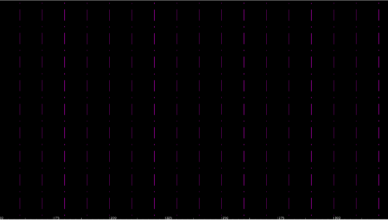
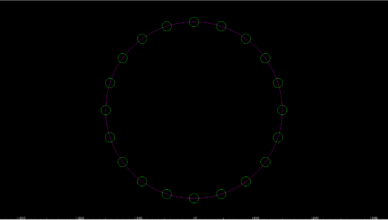
Equi-spaced Holes Along Curve in Alphacam Next option in Special Geometries in Alphacam is Equi-Spaced Holes Along Curve. To activate this option you have to draw some geometry. Let’s draw an involute curve. Now Equi-Spaced Holes Along Curve is active and we can choose this function. We could specify Number of Holes or Approx Interval…

Alphacam Basics – Involute curve – lesson 14
|

Alphacam Basics – Involute curve – lesson 14

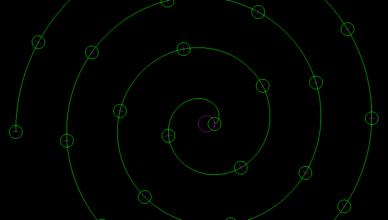
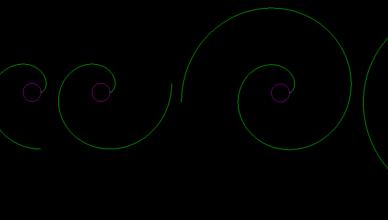
Involute curve in Alphacam Alphacam tutorial for Beginners After selecting this option you can determine: Base Circle Diameter – this circle is used to create involute curve, Number of Quadrants that are drawn to create involute curve. You can enter XY coordinates of base circle or click whenever you want in the Alphacam workspace. Some examples below: Example 1: Example 2: Example 3: Example 4: Example 5: Example 6: All together: Please see the video on YouTube!

Alphacam Basics – Bolt Hole Circle – lesson 13
|

Alphacam Basics – Bolt Hole Circle – lesson 13

Alphacam Tutorial for Beginners – Bolt Hole Circle Another special geometry is Bolt Hole Circle. This command allows you to create a circle of bolt holes around a circle. Fill the text boxes and click OK. Now you have to place circle’s center. You can click anywhere on the Alphacam workspace or enter the coordinates of the circle’s center. Please see the video on YouTube!

Alphacam Basics – Ellipse – lesson 10
|

Alphacam Basics – Ellipse – lesson 10

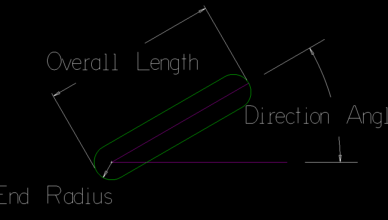
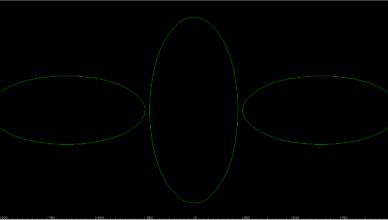
Ellipse in Alphacam Using Special Geometries we can easily draw an ellipse. After selecting this option window will appear. Width and height parameters: Width is a value of the ellipse in X axis, Height is a value of the ellipse in Y axis. Number of quadrants (1 – 4):   Number of Arcs per Quadrant – you can specify how many Arcs are used for each quadrant, the default is four, but this can be changed to any amount you would like to…